here is a code to Create your own type of variable :

Monday, 8 October 2012
Friday, 5 October 2012
VBA Special cells
VBA special cells make your life easy, instead of writing multiple lines of code and looping the the entire range of cells, this special cell types select in less than a second.
For more info visit msdn link below.
http://msdn.microsoft.com/en-us/library/office/aa213567%28v=office.11%29.aspx
For more info visit msdn link below.
http://msdn.microsoft.com/en-us/library/office/aa213567%28v=office.11%29.aspx
4 VBA Course : Colors

Let's start by assigning a color to the text in A1.
After adding Font., we get this result :
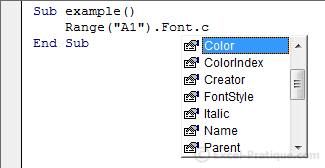
There are two different ways that we can set the color : ColorIndex, which has 56 colors, or Color which makes it possible to use any color at all.
ColorIndex :
Here you can see the 56 colors that are available through ColorIndex :

To set the color of our text to one of these 56, we should write :
Sub example()
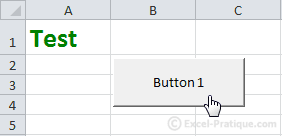
'Text color for A1 : green (Color num. 10)
Range("A1").Font.ColorIndex = 10
End SubThis code will give us the following result :
For versions of Excel lower than 2007 : using ColorIndex is preferable to using Color.
Color :
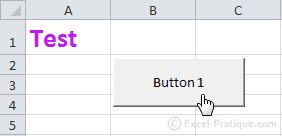
Here is a similar example in which we use Color : Sub example()
'Text color for A1 : RGB(50, 200, 100)
Range("A1").Font.Color = RGB(50, 200, 100)
End Sub
In this case, the color is : RGB(50, 200, 100).
RGB stands for Red-Green-Blue, and the numerical values go from 0 to 255 for each color.
A few examples of colors so that you can understand this better :RGB stands for Red-Green-Blue, and the numerical values go from 0 to 255 for each color.
- RGB(0, 0, 0) : black
- RGB(255, 255, 255) : white
- RGB(255, 0, 0) : red
- RGB(0, 255, 0) : green
- RGB(0, 0, 255) : blue

Choose the color that you want from this utility and just copy the three values into the RGB(red_value, green_value, blue_value).
So to change our text color to the violet above, we should use the following code :
Sub example()

   'Text color for A1 : RGB(192, 24, 255)

    Range("A1").Font.Color = RGB(192, 24, 255)

End Sub
This code will produce the following result :
For versions of Excel lower than 2007 : the number of
colors is limited (the closest available color to the RGB values will be
used).
Add colored borders :
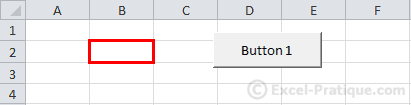
We will now create a macro that adds a border to the active cell using ActiveCell.The border will be heavy and red :
Sub example()

   'Border weight

    ActiveCell.Borders.Weight = 4

   'Border color : red

    ActiveCell.Borders.Color = RGB(255, 0, 0)

End Sub
Result :
To apply this effect to many cells at once, we can use the Selection command:
Sub example()

   'Border weight

    Selection.Borders.Weight = 4

   'Border color : red

    Selection.Borders.Color = RGB(255, 0, 0)

End Sub
Add background color to the selected cells :
Sub example()

   'Add background color to the selected cells

    Selection.Interior.Color = RGB(174, 240, 194)

End Sub
Result :
Add color to the tab for a worksheet :
Sub example()

   'Add color to the tab for "Sheet1"

    Sheets("Sheet1").Tab.Color = RGB(255, 0, 0)

End Sub
Result :
Wednesday, 3 October 2012
3 VBA Course : Properties

In this exercise, we will write VBA code that modifies the content and appearance of cells and worksheets.
First open the editor, add a module, copy the macro below into it, and link it to a formula button (Previous lesson)
Sub properties()

   'Incomplete Macro

    Range ("A8")

End SubTo display the list of possible things that can be associated with the Range object, add a period after
Range ("A8") :
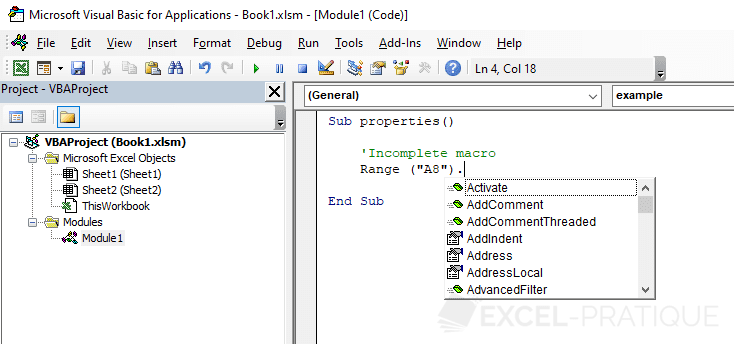
The editor will now display the various possibilities ...
In this first example, click on "Value" and then on the Tab key to validate your choice.
Sub properties()

   'Incomplete Macro

    Range("A8").Value

End Sub
In this case, the property, Value, represents the contents of the cell.
Next, we will assign the value 48 to cell A8 :
Sub properties()

   'A8 = 48

    Range("A8").Value = 48

   'Translation :

    'The value of cell A8 is equal to 48

End Sub
Then we will assign the value Sample text to cell A8 (important : the text must be within " ") :
Sub properties()
'A8 = Sample text
Range("A8").Value = "Sample text"
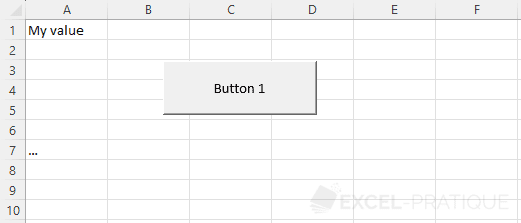
End SubIn this case, we're going to modify cell A8 on the worksheet, the cell from which the procedure is actually launched (using a formula button). If you create a second button like this on worksheet 2, it will modify cell A8 on that sheet (sheet 2).
To make it modify cell A8 on sheet 2 when you click the button on sheet 1, you have to add the following before Range : Sheets("Name_of_the_sheet") or Sheets(Number_of_the_sheet).
Sub properties()

   'A8 on sheet 2 = Sample text

    Sheets("Sheet2").Range("A8").Value = "Sample text"

   'Or :

    'Sheets(2).Range("A8").Value = "Sample text"

End SubSub properties()
'A8 on sheet 2 of workbork 2 = Sample text
Workbooks("Book2.xlsx").Sheets("Sheet2").Range("A8").Value = "Sample text"
End SubFor example, these two lines would have the same effect :
Range("A8").Value = 48

Range("A8") = 48
Erase cell contents :
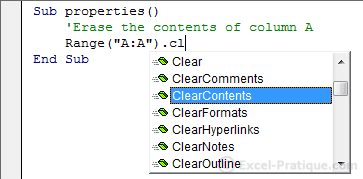
Sub properties()

   'Erase the contents of column A

    Range("A:A").ClearContents

End Sub
Text Formatting :
When you open Font., the list of properties that can be applied to text formatting will appear :
We'll explain in detail how to edit the colors on the next page ...
Formatting : change text size :
Sub properties()

   'Edit the size of text in cells A1 through A8

    Range("A1:A8").Font.Size = 18

End Sub
Formatting : make text bold :
Sub properties()

   'Make cells A1 through A8 bold

    Range("A1:A8").Font.Bold = True

End SubTo remove the "bold" formatting from text, all you have to do is replace "Yes" with "No", or in other words, "True" with "False" :
Sub properties()

   'Remove "bold" formatting from cells A1 through A8

    Range("A1:A8").Font.Bold = False

End Sub
Formatting : italicize text :
Sub properties()

   'Italicize cells A1 through A8

    Range("A1:A8").Font.Italic = True

End Sub
Formatting : underline text :
Sub properties()

   'Underline cells A1 through A8

    Range("A1:A8").Font.Underline = True

End Sub
Formatting : Set font :
Sub properties()

   'Edit font in cells A1 through A8

    Range("A1:A8").Font.Name = "Arial"

End Sub
Add borders :
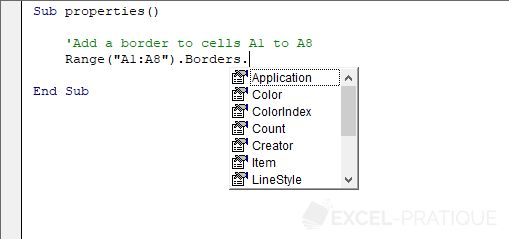
Sub properties()

    'Add a border to cells A1 to A8

     Range("A1:A8").Borders.Value = 1

    'Value = 0    => no border

End Sub
Change the formatting of currently selected cells :
Sub properties()

    'Add a border to selected cells

     Selection.Borders.Value = 1

End Sub
Change a worksheet's properties :
Sub properties()
'Hide a worksheet
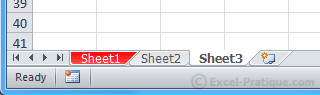
Sheets("Sheet3").Visible = 0
'Visible = -1 => cancels the effect
End SubDon't forget that we've only introduced a tiny minority of the possible customizations that can be done with VBA. If the property that you are looking for isn't described in detail here, don't be afraid to look for it in the list of properties in Excel or in Excel's own help files.
The macro recorder can also save you a lot of time if you don't know the name of a property. If you record the action that you need, it will be easy to find the name of the property so that you can then use it in your own macro.
Change the value of a cell based on another cell :
In this case, we want A7 to take its value from A1 :
So we will tell A7 to take its value from A1, which would look like this :
Sub properties()

    'A7 = A1

     Range("A7") = Range("A1")

    'Or :

     'Range("A7").Value = Range("A1").Value

End Sub
If we only wanted to copy the text size from the other cell, the code would look like this :
Sub properties()

     Range("A7").Font.Size = Range("A1").Font.Size

End Sub
Anything on the left side of the = takes on the value of what is on the right side of the =.
Change the value of a cell based on its own value :
Now we're going to create a click counter.
Each time we click, the value of A1 will be incremented by 1:
Sub properties()

    'Click counter in A1

     Range("A1") = Range("A1") + 1

End Sub
Excel executes the code line by line, so these commentaries should help you understand the code itself :
'For example : before the code is executed, A1 has the value 0


Sub properties()


   'The button has been clicked, so the procedure is starting

    'For the moment, A1 still has the value 0


   'DURING the execution of the line immediately below, A1 still has the value 0

    Range("A1") = Range("A1") + 1 'And now the calculation is : New_value_of_A1 = 0 + 1

    'A1 has the value 1 only AFTER the execution of the line of code


End Sub
With :
This code makes it possible to set different properties of the active cell :Sub properties()
ActiveCell.Borders.Weight = 3
ActiveCell.Font.Bold = True
ActiveCell.Font.Size = 18
ActiveCell.Font.Italic = True
ActiveCell.Font.Name = "Arial"
End SubIn this case, we can use With to avoid having to repeat ActiveCell.
Now you will see how With works:
Sub properties()

   'Beginning of instructions using command: WITH

    With ActiveCell

        .Borders.Weight = 3

        .Font.Bold = True

        .Font.Size = 18

        .Font.Italic = True

        .Font.Name = "Arial"

   'End of instructions using command: END WITH

    End With

End Sub
This way we don't have to repeat ActiveCell.
Although it isn't really necessary in this case, we could avoid repeating .Font, too, which would look like this :
Sub properties()

    With ActiveCell

        .Borders.Weight = 3

        With .Font

            .Bold = True

            .Size = 18

            .Italic = True

            .Name = "Arial"

        End With

    End With

End Sub2 VBA Course : Selections

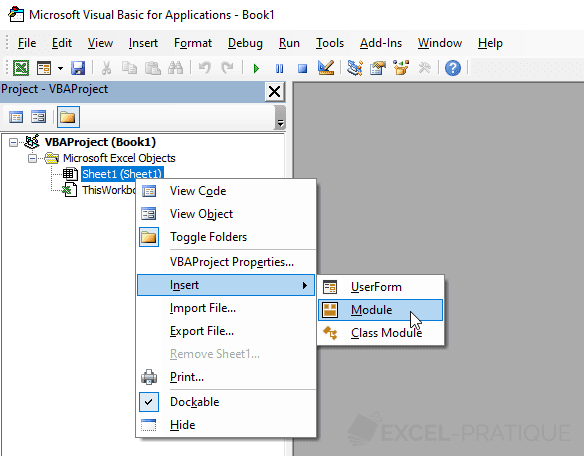
First open the editor and add a module :
In the module, type "sub selection" and press Enter.
You will notice that Excel has automatically filled in the end of this new procedure :
Sub selection()
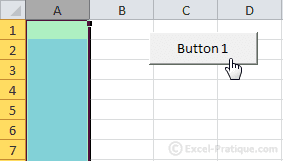
End SubNow create a formula button to which you will associate this macro (it is empty for now) :
Complete your macro with this code :
Sub selection()

   'Select cell A8

    Range("A8").Select

End Sub
You can test this macro by clicking on your formula button, and you will see that cell A8 is now selected.
We will now edit the macro so that it selects cell A8 on the second worksheet :
Sub selection()

   'Activating of Sheet 2

    Sheets("Sheet2").Activate

   'Selecting of Cell A8

    Range("A8").Select

End Sub
Excel will now activate Sheet 2 and then select cell A8.
Note : the comments (text in green) will help you understand the macros in this course correctly.
Selecting different cells :
Sub selection()

   'Selecting A8 and C5

    Range("A8, C5").Select

End Sub
Selecting a range of cells :
Sub selection()

   'Selecting cells A1 to A8

    Range("A1:A8").Select

End Sub
Selecting a range of cells that has been renamed :
Sub selection()

   'Selecting cells from the "my_range" range

    Range("my_range").Select

End Sub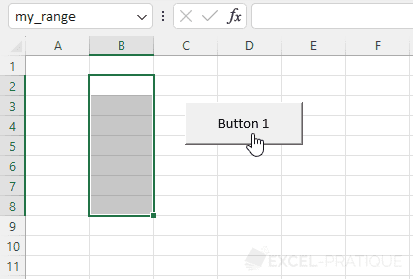
Selecting a cell by row and column number :
Sub selection()

   'Selecting the cell in row 8 and column 1

    Cells(8, 1).Select

End Sub
This method of selecting cells allows for more dynamic selections. It will be quite useful further along.
Here is a little example :
Sub selection()

   'Random selection of a cell from row 1 to 10 and column 1

    Cells(Int(Rnd * 10) + 1, 1).Select

   'Translation :

    'Cells([random_number_between_1_and_10], 1).Select

End Sub
In this case, the row number is : Int(Rnd * 10) + 1, or in other words : a number between 1 and 10 (there's no reason you should learn this code at this point).
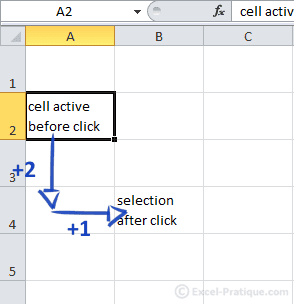
Moving a selection :
Sub selection()

   'Selecting a cell (described in relation to the cell that is currently active)

    ActiveCell.Offset(2, 1).Select

End Sub
Moving the selection box two rows down and one column to the right :
Selecting rows :
It is possible to select entire rows using the Range or Rows commands (the Rows command is of course specific to rows).
Sub selection()

   'Selecting rows 2 to 6

    Range("2:6").Select

End Sub
Sub selection()
'Selecting rows 2 to 6
Rows("2:6").Select
End SubSelecting columns :
As with rows, it is possible to select entire columns using the Range or Columns commands (the Columns command is of course specific to columns).
Sub selection()

   'Selecting columns B to G

    Range("B:G").Select

End Sub
Sub selection()
'Selecting columns B to G
Columns("B:G").Select
End Sub1 VBA Course : First Macro
The macro recorder makes it very easy to automate certain tasks.
To give just one example, we will automate the following actions :
- delete the contents of columns A and C
- move the contents of column B to column A
- move the contents of column D to column C
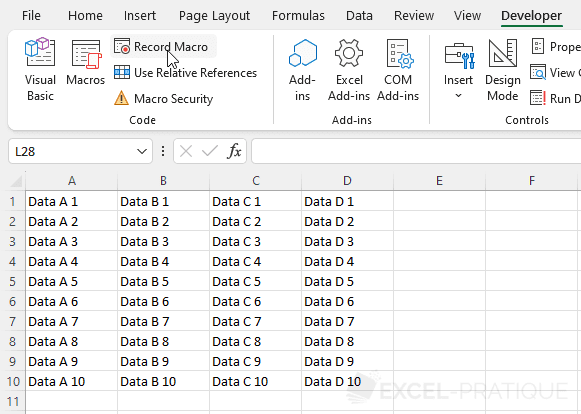
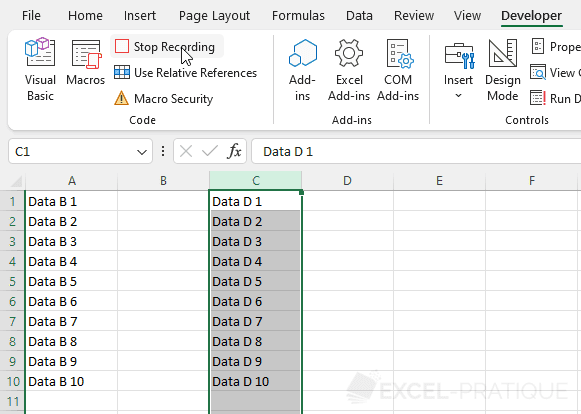
To do this, click on "Record Macro" and then "Ok", carry out the actions described above without interruption (because everything you do will be recorded) and then click on "Stop Recording".
For versions of Excel lower than 2007 : Tools > Macros > Record New Macro.
Excel has recorded your actions and translated them into VBA code.
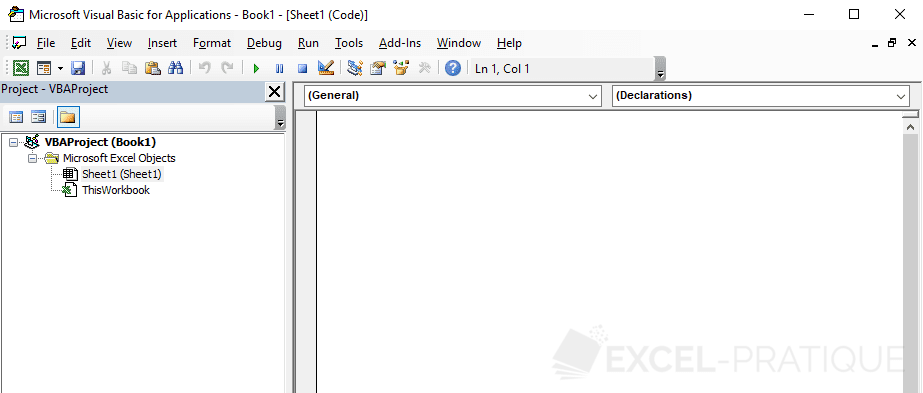
To view your macro, open the editor (Alt F11) and click on "Module1" :
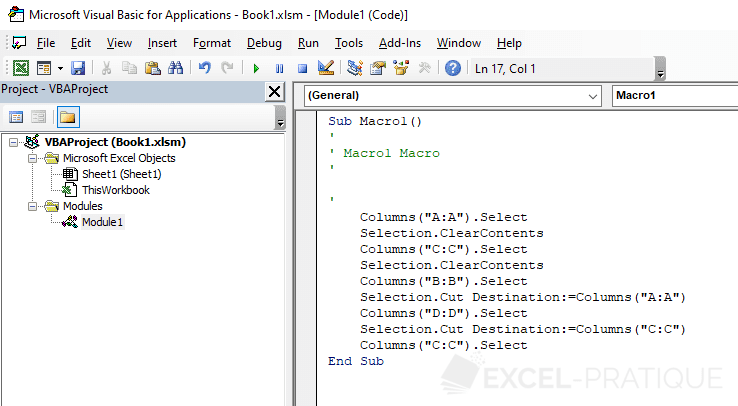
This code represents the recorded actions.
Let's take a moment to look at the code that Excel has generated :
Sub Macro1()

'

' Macro1 Macro

'


'

     Columns("A:A").Select

    Selection.ClearContents

    Columns("C:C").Select

    Selection.ClearContents

    Columns("B:B").Select

    Selection.Cut Destination:=Columns("A:A")

    Columns("D:D").Select

    Selection.Cut Destination:=Columns("C:C")

    Columns("C:C").Select

End Sub
Sub and End Sub mark the beginning and end of the macro, and "Macro1" is the name of this macro :
Sub Macro1()


End Sub
Let's edit the name of the macro to make it more descriptive, changing "Macro1" to "column_handling" (the name of the macro cannot contain any spaces) :
Sub column_handling()The text in green (text preceeded by an apostrophe) is commentary, and will be ignored when the code is executed :
'

' Macro1 Macro

'


'
This kind of commentary can be very useful for finding things when there is a lot of code, or when you want to prevent the execution of certain lines of code without deleting them.
Sub column_handling()

'

'My first commentary !

'

     Columns("A:A").Select

    Selection.ClearContents

    Columns("C:C").Select

    Selection.ClearContents

    Columns("B:B").Select

    Selection.Cut Destination:=Columns("A:A")

    Columns("D:D").Select

    Selection.Cut Destination:=Columns("C:C")

    Columns("C:C").Select

End Sub
Now we want this macro to be executed at the click of a button.
Click on Insert > Button (Form controls) :
For versions of Excel lower than 2007 : "Button" from the "Formulas" toolbar.
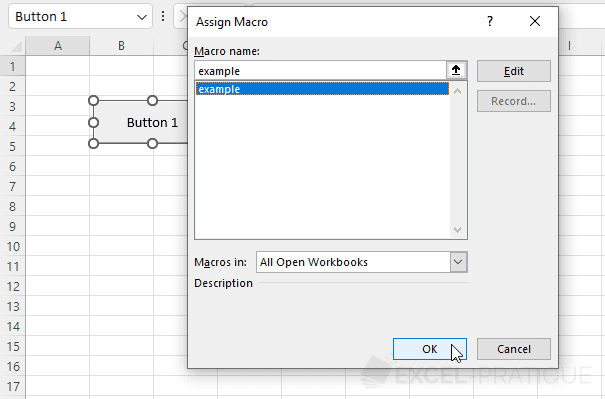
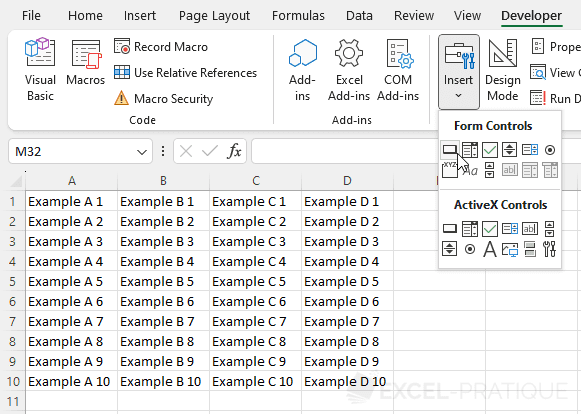 Insert your button and then just select the macro that you created :
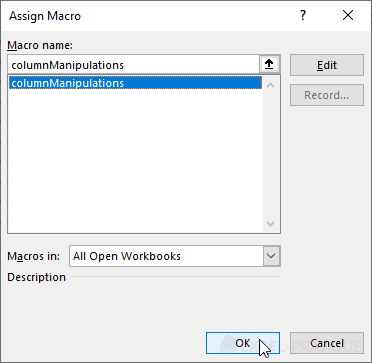
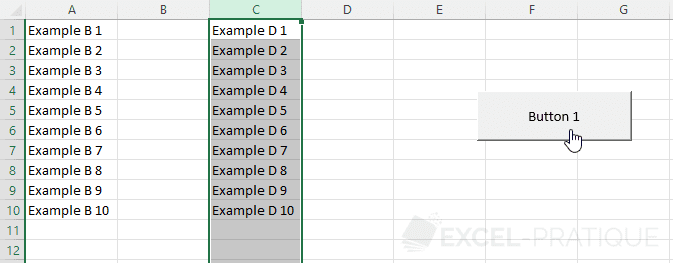
When you click on the button, your macro will be executed :
VBA Course : Introduction

Using VBA, we can do almost anything imaginable with Excel ...
But before we get started, let's begin by making sure that the tools we need are visible.
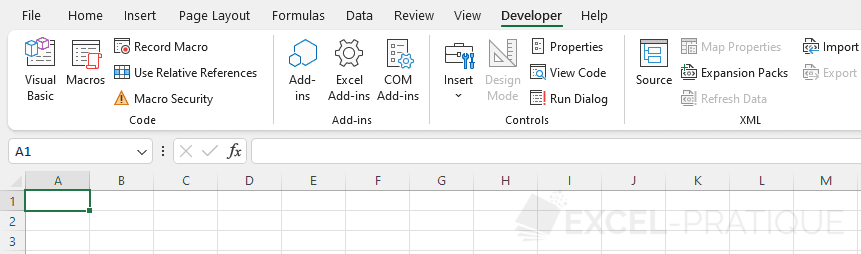
If you are using Excel version 2007 (or a higher version), click on File > Options > Customize the Ribbon and then check "Developer".
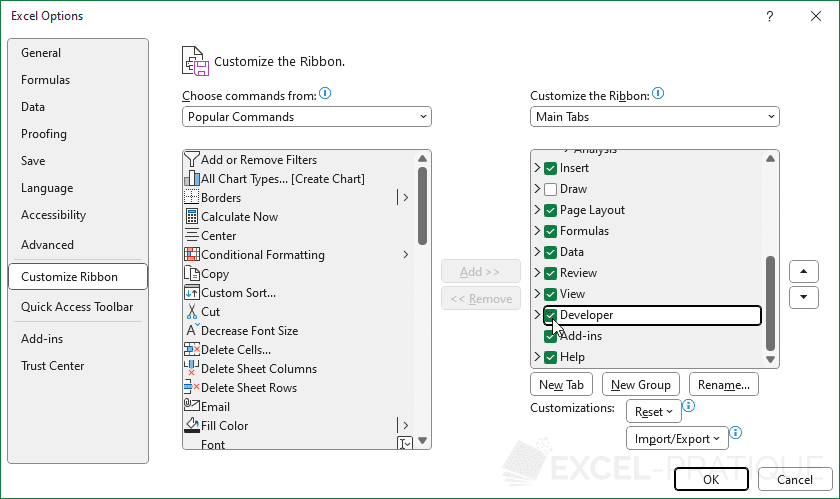
A new tab will be added :
If the version of Excel that you are using is lower than 2007, add the "Control Toolbox" and "Formulas" toolbars.
We'll come back to this. What's important for now is just to remember the "Alt F11" shortcut ...
Friday, 28 September 2012
VBA: Application Open FileName List all Excel File types
When you are showing a open dialog box to the user to select an excel file, by default the filter would be *.* which will show all files including excel files. and .xls and .xlsx will show only 97-2003 and 2007 excel files and failed to show .xlsb and .xlsm files. The below code (.xls*) will show all types of excel files.
Wednesday, 26 September 2012
VBA: Array - Return common values from two arrays
The below function will return the common values that are exist in two different arrays. This can be achieved by nested-looping concept, but this is an effective way :).IsInArray is an another function. Dont forget to include it.
aa
aa
VBA: Distinct Array items - Remove duplicates
If you have an array with repeated items and want distinct items, then copy the below source code. IsInArray is an another function. Dont forget to include it.
VBA: IsInArray - Find a value in array items
The below script will be used to get to know whether a particular item exists in a array or not. Instead of looping this would be faster.
VBA: Cell Data Validation list to an array
The below function will be used to get list of Cell data validation and store into an array variable. This code is needed when checking the cell value as whether it is picked from the validation drop-down or the validation rule overridden by copy-paste the cell value. (Excel has this flaw, whatever the data validation you define, simply that can be overriden by clipboard data Ctrl+C Ctrl+P)
Monday, 24 September 2012
VBA Excel : Sheet Named range into Array
The below code will be used to access the list of named-range values and pass to an array variable.
Monday, 17 September 2012
VBA - Extract notes section from PPT

Note: Please include Reference Libraries Microsoft PowerPoint XX.0 Object Library & Microsoft Scripting Runtime
VBA - Unzip files using VBA

The below code will Unzip a *.zip file to a specific folder. We have already seen couple of examples like 'Accessing system special folders' and 'Creating shortcut of an system application', This code also in the same series of Unzipping the files. Quite useful if you are designing a complete protect and want to install in client machine.
VBA - Protect Sheet from User / Allow macro

Generally, if you want your vba code to run on a protected sheet, you wrap your code in unprotect/protect statements in every procedure or function. You also have to remember to protect the sheet in case it is unprotected. Here is the attached file that clearly explains how you can avoid this.
The following code in the Workbook_Open procedure/event protects all the sheets from the user but allows the macro code to work on the sheets.
VBA - Export to Powerpoint

Customization Options:
> Add new slide at the end / beginning
> Copy paste the excel chart as Image / Html
> Enable / Disable Chart link to the excel
> Zoom / Align the Powerpoint slides from Excel
VBA - Download files from sharepoint
You can now do the same kind to upload files in sharepoint, will try my best to post a code for Uploading files to sharepoint.

Append string to a existing notepad (.txt) file in sharepoint
The below code will be used to append string to an existing text file in a sharepoint folder, you can do the same function with an existing folder in your computer/ shared folder.
e.g. When you want to create an user's log to a workbook in a separate file, you can use this code.
e.g. When you want to create an user's log to a workbook in a separate file, you can use this code.
Wednesday, 5 September 2012
VBA : List Special Folders
The following code displays path of all special folders in Windows on the worksheet. Copy the following code in a general module and run(F5).
e.g.
e.g.
| Special Folder | Path |
| Desktop | C:\Users\Public\Desktop |
| Start Menu | C:\ProgramData\Microsoft\Windows\Start Menu |
| Programs | C:\ProgramData\Microsoft\Windows\Start Menu\Programs |
| Startup | C:\ProgramData\Microsoft\Windows\Start Menu\Programs\Startup |
| Desktop | C:\Users\Kannan\Desktop |
| Roaming | C:\Users\Kannan\AppData\Roaming |
Tuesday, 4 September 2012
VBA Excel: Create shortcut of an Application
The below example create an Shortcut of Notepad.exe in the desktop. This will be useful when you are doing a end-to-end product package, create shortcut of your application in the desktop.
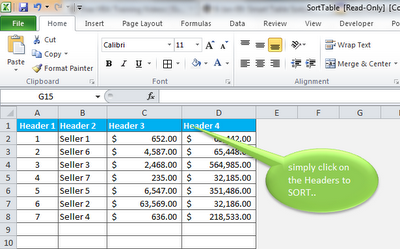
VBA Excel: Table Intelligent Sort
This is really an interesting post, will be quit useful in dashboards, scorecards and wherever high UI is needed. Like many statistical applications, data of multicolumn, if user want to sort by many categories the below code will be the best suit.
Tips: If you link the data range with the chart data, you can see real magic. Sooner i will post some free codes under 'CHART' category for chart animations and many :)
Worksheet Snapshot:
Tips: If you link the data range with the chart data, you can see real magic. Sooner i will post some free codes under 'CHART' category for chart animations and many :)
Worksheet Snapshot:

VBA Excel: Track Cell Change
We have seen Cell Change Tracking example to track when the change has been done and who did the change, the below example is bit advanced. It will show which cell has been modified by whom and what was the previous value before the modification.
VBA Excel: Userform > Set Parent
The below code will be used to set the UserForm UF as a child of (1) the Application, (2) the Excel ActiveWindow, or (3) no parent. Returns TRUE if successful
VBA Excel: Userform > Opaque / Transparent
The below code will be used to set the Opaque / Transparency Level of the userform. Usually the VBA Userform doesn't have this feature, but through API functions we can do this.
See Declaration Library post to understand and get the API function declarations.
See Declaration Library post to understand and get the API function declarations.
VBA Excel: Userform > Resize Property
The below code will be used to make the Userform resizable . Usually the VBA Userform doesn't have this feature, but through API functions we can do this.
See Declaration Library post to understand and get the API function declarations.
See Declaration Library post to understand and get the API function declarations.
VBA Excel: Userform > Title bar
The below code will be used to customize the Title Bar in the userform. Usually the VBA Userform doesn't have this feature, but through API functions we can play with the Title Bar in the userform.
See Declaration Library post to understand and get the API function declarations.
See Declaration Library post to understand and get the API function declarations.
VBA Excel: Userform > Close Button
The below code will be used to customize the Close button in the userform. Usually the VBA Userform doesn't have this feature, but through API functions we can play with the Close button in the userform.
See Declaration Library post to understand and get the API function declarations.
See Declaration Library post to understand and get the API function declarations.
VBA Excel: Userform > Minimize Button
The below code will be used to customize the Minimize button in the userform. Usually the VBA Userform doesn't have this feature, but through API functions we can enable the minimize button in the userform.
See Declaration Library post to understand and get the API function declarations.
See Declaration Library post to understand and get the API function declarations.
VBA Excel: Userform > Maximize Button
The below code will be used to customize the Maximize button in the userform. Usually the VBA Userform doesn't have this feature, but through API functions we can enable the maximize button in the userform.
See Declaration Library post to understand and get the API function declarations.
See Declaration Library post to understand and get the API function declarations.
Subscribe to:
Posts (Atom)