

In this exercise, we will write VBA code that modifies the content and appearance of cells and worksheets.
First open the editor, add a module, copy the macro below into it, and link it to a formula button (Previous lesson)
Sub properties()

   'Incomplete Macro

    Range ("A8")

End SubTo display the list of possible things that can be associated with the Range object, add a period after
Range ("A8") :
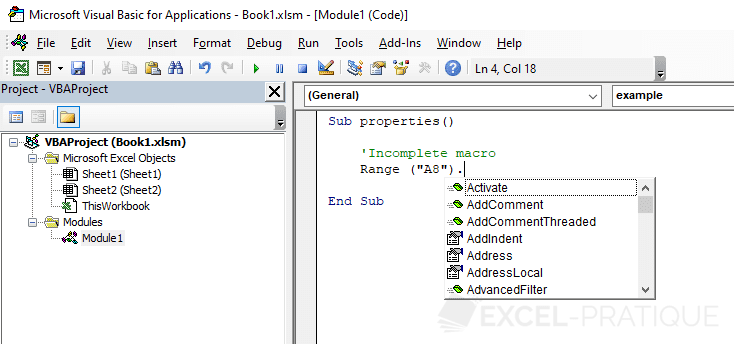
The editor will now display the various possibilities ...
In this first example, click on "Value" and then on the Tab key to validate your choice.
Sub properties()

   'Incomplete Macro

    Range("A8").Value

End Sub
In this case, the property, Value, represents the contents of the cell.
Next, we will assign the value 48 to cell A8 :
Sub properties()

   'A8 = 48

    Range("A8").Value = 48

   'Translation :

    'The value of cell A8 is equal to 48

End Sub
Then we will assign the value Sample text to cell A8 (important : the text must be within " ") :
Sub properties()

   'A8 = Sample text

    Range("A8").Value = "Sample text"

End Sub
In this case, we're going to modify cell A8 on the worksheet, the cell from which the procedure is actually launched (using a formula button). If you create a second button like this on worksheet 2, it will modify cell A8 on that sheet (sheet 2).
To make it modify cell A8 on sheet 2 when you click the button on sheet 1, you have to add the following before Range : Sheets("Name_of_the_sheet") or Sheets(Number_of_the_sheet).
Sub properties()

   'A8 on sheet 2 = Sample text

    Sheets("Sheet2").Range("A8").Value = "Sample text"

   'Or :

    'Sheets(2).Range("A8").Value = "Sample text"

End SubSub properties()
'A8 on sheet 2 of workbork 2 = Sample text
Workbooks("Book2.xlsx").Sheets("Sheet2").Range("A8").Value = "Sample text"
End SubFor example, these two lines would have the same effect :
Range("A8").Value = 48

Range("A8") = 48
Erase cell contents :
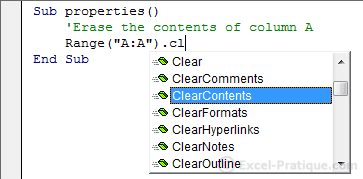
Sub properties()

   'Erase the contents of column A

    Range("A:A").ClearContents

End Sub
Text Formatting :
When you open Font., the list of properties that can be applied to text formatting will appear :
We'll explain in detail how to edit the colors on the next page ...
Formatting : change text size :
Sub properties()

   'Edit the size of text in cells A1 through A8

    Range("A1:A8").Font.Size = 18

End Sub
Formatting : make text bold :
Sub properties()

   'Make cells A1 through A8 bold

    Range("A1:A8").Font.Bold = True

End SubTo remove the "bold" formatting from text, all you have to do is replace "Yes" with "No", or in other words, "True" with "False" :
Sub properties()

   'Remove "bold" formatting from cells A1 through A8

    Range("A1:A8").Font.Bold = False

End Sub
Formatting : italicize text :
Sub properties()

   'Italicize cells A1 through A8

    Range("A1:A8").Font.Italic = True

End Sub
Formatting : underline text :
Sub properties()

   'Underline cells A1 through A8

    Range("A1:A8").Font.Underline = True

End Sub
Formatting : Set font :
Sub properties()

   'Edit font in cells A1 through A8

    Range("A1:A8").Font.Name = "Arial"

End Sub
Add borders :
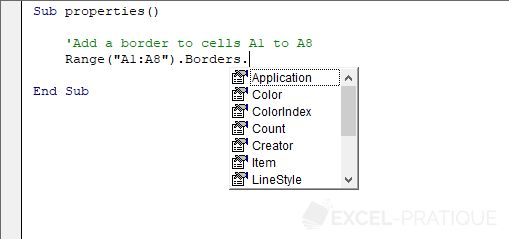
Sub properties()

    'Add a border to cells A1 to A8

     Range("A1:A8").Borders.Value = 1

    'Value = 0    => no border

End Sub
Change the formatting of currently selected cells :
Sub properties()

    'Add a border to selected cells

     Selection.Borders.Value = 1

End Sub
Change a worksheet's properties :
Sub properties()

     'Hide a worksheet

     Sheets("Sheet3").Visible = 0

     'Visible = -1     => cancels the effect

End Sub
Don't forget that we've only introduced a tiny minority of the possible customizations that can be done with VBA. If the property that you are looking for isn't described in detail here, don't be afraid to look for it in the list of properties in Excel or in Excel's own help files.
The macro recorder can also save you a lot of time if you don't know the name of a property. If you record the action that you need, it will be easy to find the name of the property so that you can then use it in your own macro.
Change the value of a cell based on another cell :
In this case, we want A7 to take its value from A1 :
So we will tell A7 to take its value from A1, which would look like this :
Sub properties()

    'A7 = A1

     Range("A7") = Range("A1")

    'Or :

     'Range("A7").Value = Range("A1").Value

End Sub
If we only wanted to copy the text size from the other cell, the code would look like this :
Sub properties()

     Range("A7").Font.Size = Range("A1").Font.Size

End Sub
Anything on the left side of the = takes on the value of what is on the right side of the =.
Change the value of a cell based on its own value :
Now we're going to create a click counter.
Each time we click, the value of A1 will be incremented by 1:
Sub properties()

    'Click counter in A1

     Range("A1") = Range("A1") + 1

End Sub
Excel executes the code line by line, so these commentaries should help you understand the code itself :
'For example : before the code is executed, A1 has the value 0


Sub properties()


   'The button has been clicked, so the procedure is starting

    'For the moment, A1 still has the value 0


   'DURING the execution of the line immediately below, A1 still has the value 0

    Range("A1") = Range("A1") + 1 'And now the calculation is : New_value_of_A1 = 0 + 1

    'A1 has the value 1 only AFTER the execution of the line of code


End Sub
With :
This code makes it possible to set different properties of the active cell :Sub properties()
ActiveCell.Borders.Weight = 3
ActiveCell.Font.Bold = True
ActiveCell.Font.Size = 18
ActiveCell.Font.Italic = True
ActiveCell.Font.Name = "Arial"
End SubIn this case, we can use With to avoid having to repeat ActiveCell.
Now you will see how With works:
Sub properties()

   'Beginning of instructions using command: WITH

    With ActiveCell

        .Borders.Weight = 3

        .Font.Bold = True

        .Font.Size = 18

        .Font.Italic = True

        .Font.Name = "Arial"

   'End of instructions using command: END WITH

    End With

End Sub
This way we don't have to repeat ActiveCell.
Although it isn't really necessary in this case, we could avoid repeating .Font, too, which would look like this :
Sub properties()

    With ActiveCell

        .Borders.Weight = 3

        With .Font

            .Bold = True

            .Size = 18

            .Italic = True

            .Name = "Arial"

        End With

    End With

End Sub
No comments:
Post a Comment